
Welcome to the world of precision foam fabrication. For business owners and production managers, mastering the art of cutting foam with a CNC machine isn’t just a skill—it’s a competitive advantage. This guide is your inside look, drawing from my decades of experience as Allen, a manufacturer of EPS and EPP machinery. I’ve spoken with hundreds of clients like Mark Thompson from the USA, who need reliable, efficient equipment to stay ahead. This article will walk you through the entire process, from choosing the right material to optimizing your machine settings, helping you avoid common mistakes and achieve perfect results every time.
What Exactly is CNC Foam Cutting and Why is it a Game-Changer?
CNC stands for "Computer Numerical Control." At its core, it’s a process where a computer directs a machine’s movements. When we talk about CNC foam cutting, we’re referring to using this technology to precisely carve, shape, and cut foam materials. Think of it as a highly intelligent and incredibly precise robotic arm holding a cutting tool. You create a design on a computer (a CAD file), send it to the CNC machine, and it brings your vision to life by cutting the foam block or sheet. It’s a world away from manual methods that rely on a handheld hot knife or templates.
The impact on industries has been massive. For packaging companies, it means creating custom-fit inserts that protect products perfectly. In construction, it’s used for crafting complex architectural details and high-efficiency insulation panels. For prototyping and model making, the speed and accuracy are unparalleled. As a manufacturer, I’ve seen clients transform their production lines. They go from slow, labor-intensive processes to a highly automated workflow that produces consistent, high-quality parts. This isn’t just about cutting faster; it’s about unlocking new design possibilities, reducing material waste, and significantly boosting profitability. The precision allows for intricate designs that are simply impossible by hand, opening doors to new markets and custom projects.
The real advantage lies in repeatability and precision. Once you have the design file and the machine settings dialed in, you can produce a hundred or a thousand identical pieces with zero deviation. This consistency is critical for businesses that supply components to other industries, like automotive or appliance manufacturing. Furthermore, modern CNC foam cutting equipment is incredibly versatile. The same machine can be used to cut different types of foam with a simple change of the cutting bit and a few adjustments to the program. This flexibility is invaluable for businesses that need to adapt to changing client demands.
Which Types of Foam Can You Reliably Cut with a CNC Machine?
One of the first questions I get at exhibitions is about material compatibility. The good news is that CNC technology is incredibly versatile and works with a wide range of foams. The key is understanding the properties of each material to select the right cutting method and tool.
Here’s a breakdown of common foams used in CNC applications:
- Expanded Polystyrene (EPS): This is the lightweight, rigid white foam you see used in packaging, coolers, and construction insulation. It’s made of expanded beads fused together. EPS is very easy to cut with a CNC router or hot wire cutter, producing clean edges with the right settings. Its structure can sometimes lead to a slightly rougher surface finish, but it’s cost-effective and widely available.
- Extruded Polystyrene (XPS): Often recognized by its color (blue, pink, or green), XPS has a more uniform, closed-cell structure than EPS. This gives it a smoother finish when cut and makes it more resistant to moisture. It’s a favorite for architectural models, signage, and high-density insulation boards.
- Expanded Polypropylene (EPP): This is a remarkable material known for its durability and flexibility. Unlike EPS, EPP can absorb impacts and return to its original shape. It’s heavily used in the automotive industry for bumpers and internal safety components. Cutting EPP requires sharp bits and careful attention to speed to avoid melting.
- Polyurethane Foam: This comes in many forms, from soft, flexible foam for upholstery to rigid, high-density foam (often called tooling board) used for creating molds and prototypes. Rigid polyurethane mills beautifully, allowing for incredible surface detail and a finish that can resemble wood or plastic.
- Polyethylene Foam (PE): This is the closed cell foam often used for case inserts, flotation devices, and gaskets. It’s tough and slightly flexible. Cutting PE foam requires a very sharp cutter to get a clean slice without tearing.
Understanding the density and cell structure of your chosen foam is crucial. Softer foams might compress or tear if the wrong bit is used, while denser foams require more power and a slower feed rate to carve cleanly. Always run a small test cut on a piece of scrap material before committing to a large project.
How Do You Choose the Right CNC Router for Foam Applications?
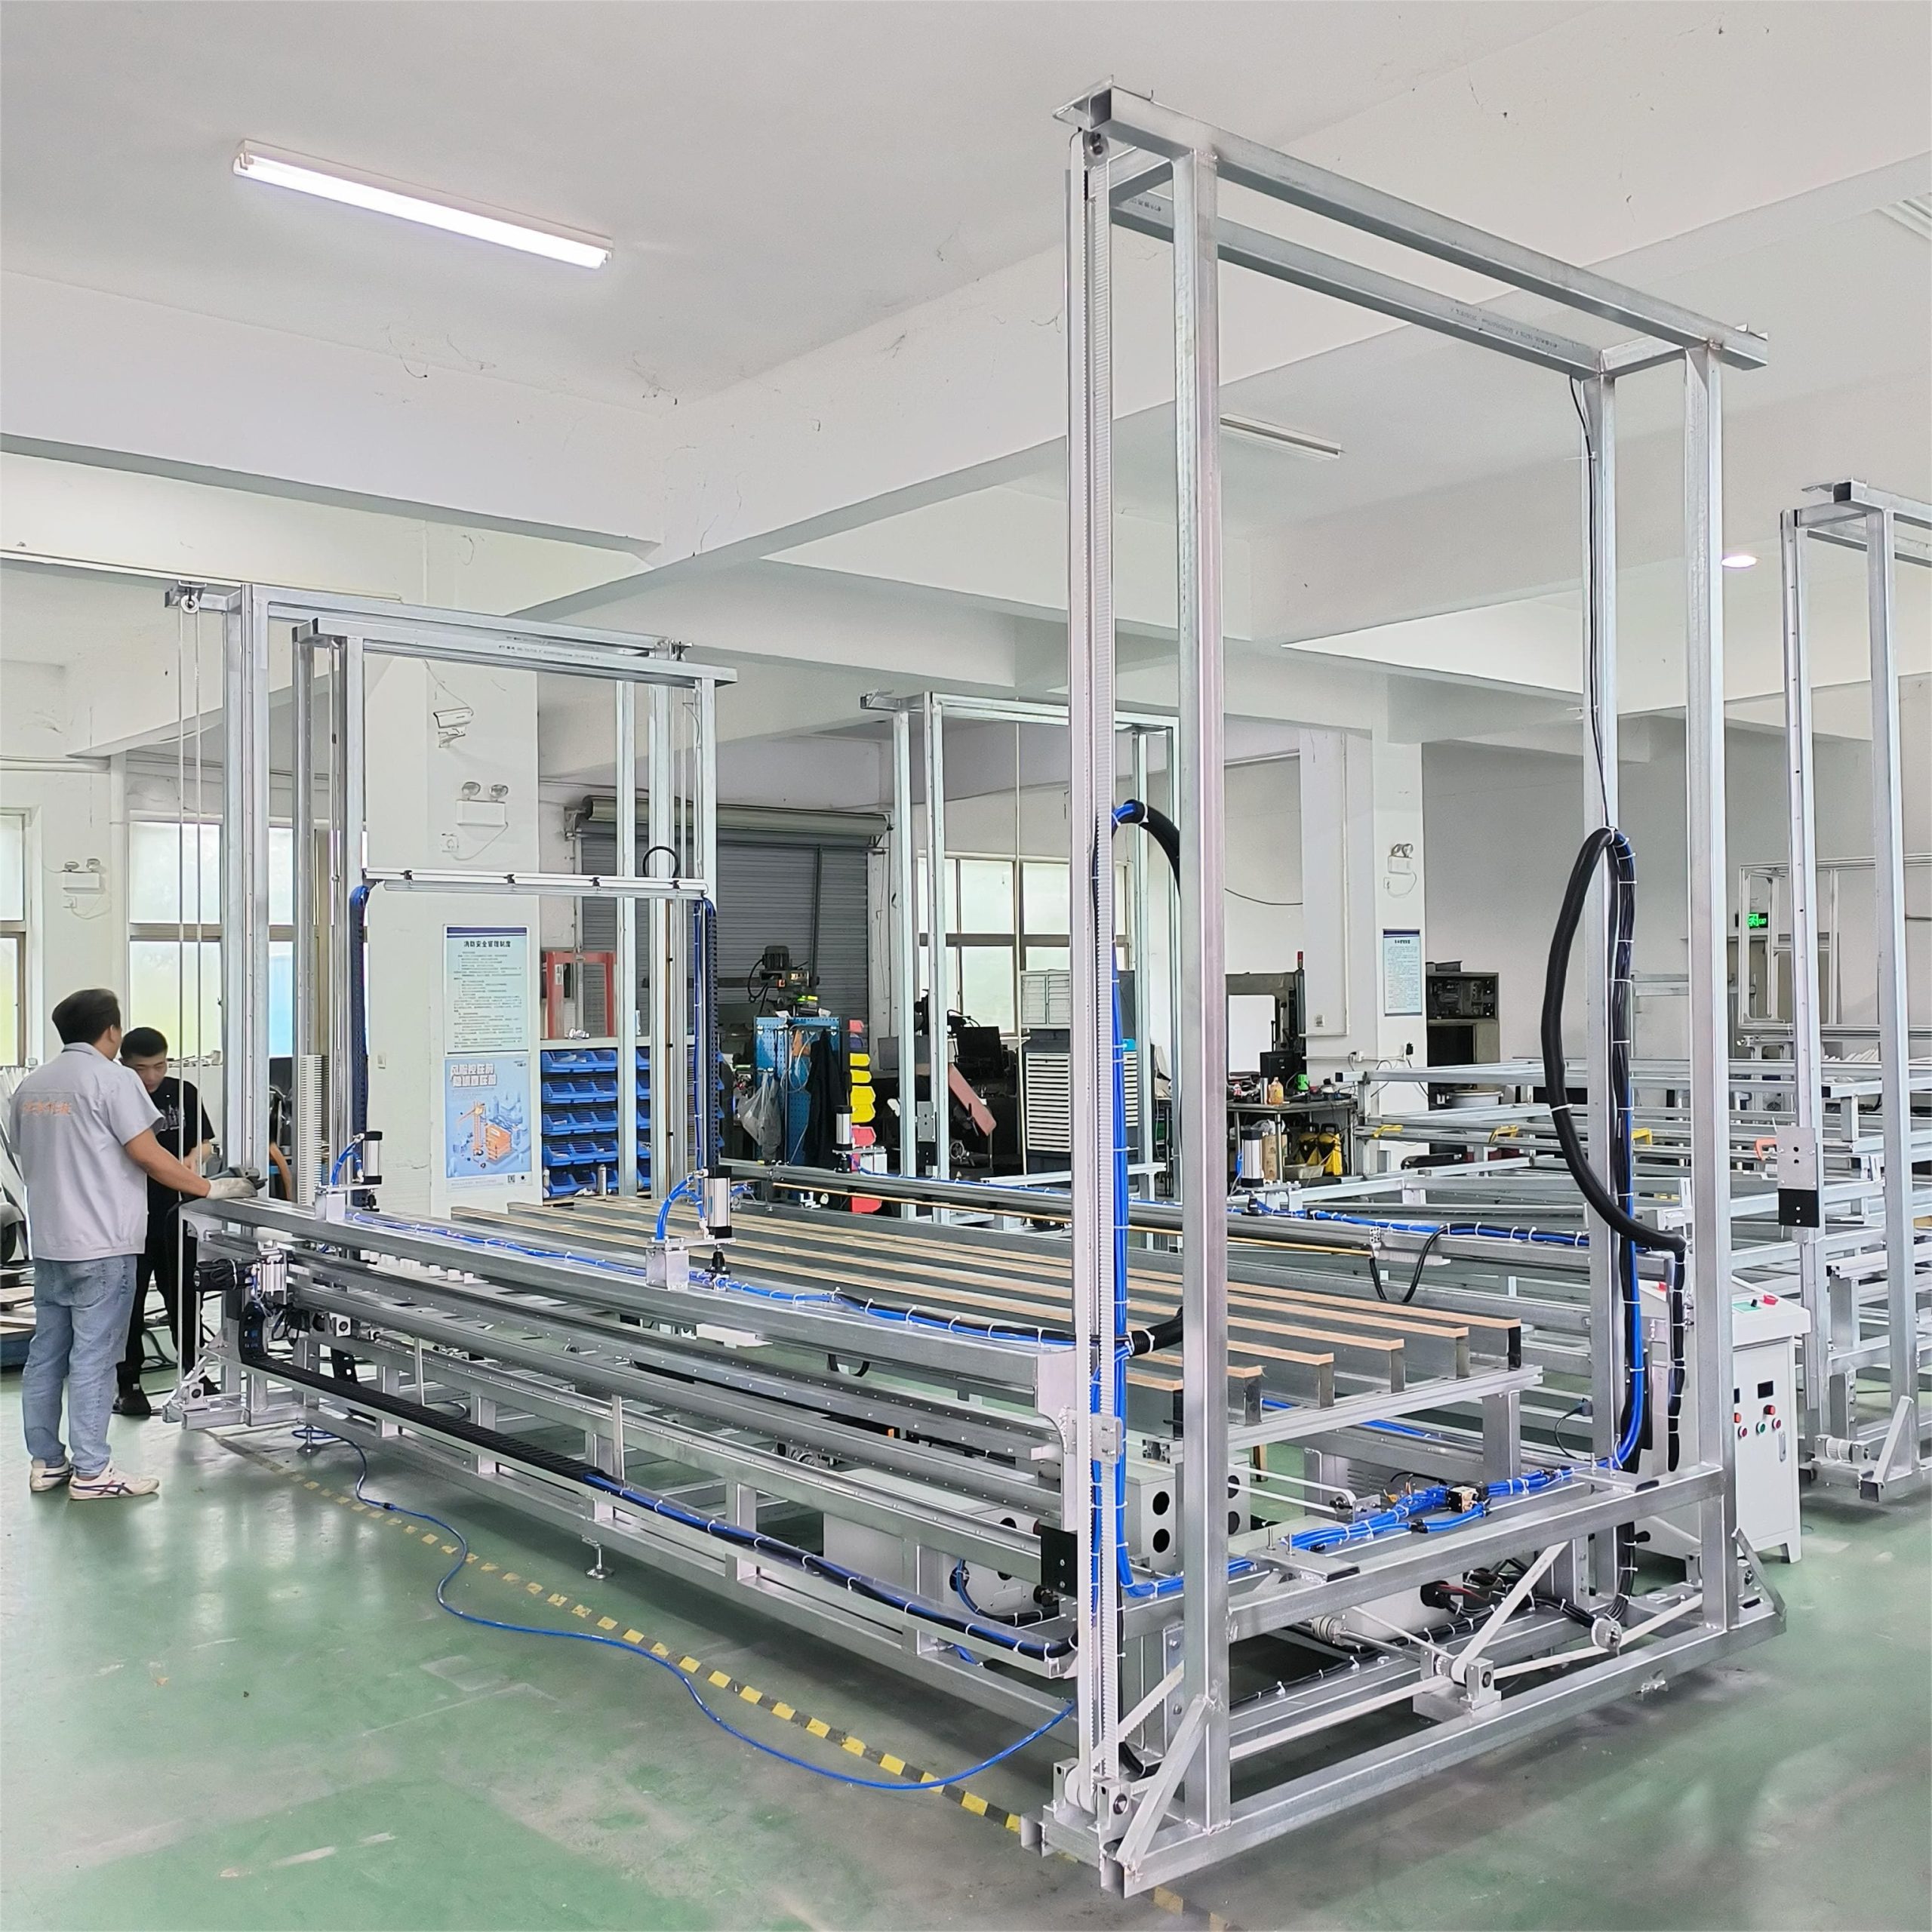
Selecting the right CNC machine is the single most important decision you’ll make. It’s the foundation of your production capability. When customers come to me, they’re often balancing budget with performance. For foam cutting, you don’t necessarily need the immense power required for cutting steel, but you do need speed, precision, and a large work area. A key consideration is the gantry height (the clearance under the main cross-beam). Since you’ll often be working with thick blocks of foam, you need enough vertical space (Z-axis travel) to accommodate both the material and the length of your cutting bit.
Look for a machine with a robust frame that minimizes vibration. Even though foam is light, high-speed movements can cause a flimsy machine to shake, resulting in a poor surface finish. High-quality servo motors or stepper motors are essential for fast, accurate positioning. Another critical component is the spindle. For foam, you don’t need a high-horsepower spindle, but one with a high RPM (revolutions per minute) range is beneficial. This allows the bit to slice through the material cleanly rather than pushing or tearing it. Many operators find that a higher rpm with a fast feed rate gives the best results.
Finally, consider the control system and software compatibility. A user-friendly interface reduces the learning curve and minimizes errors. Ensure the machine can easily import standard file types like DXF, STL, and G-code from your preferred CAD/CAM software. For businesses scaling up, automation features are a must. A great example is a complete production line that automates the entire process. For instance, our Best Sale EPS Cutting Line integrates block handling, multiple cutting stages, and even packing, which dramatically increases efficiency for high-volume producers.
What are the Best Bits and Cutters for CNC Foam Carving?
The cutting tool is where the magic happens. Using the wrong bit is like trying to paint a masterpiece with a house brush—the results will be disappointing. For foam, the goal is to evacuate chips (the small pieces of cut material) as quickly as possible to prevent them from melting and sticking to the bit or the workpiece. This means you should look for bits with deep, open flutes.
Here’s a comparison of popular bit types for foam:
| Bit Type | Flutes | Best For | Pros | Cons |
|---|---|---|---|---|
| Up-cut Spiral | 1 or 2 | General-purpose cutting, fast material removal | Excellent chip evacuation, keeps the cut cool. | Can lift the top edge of thin material slightly. |
| Down-cut Spiral | 1 or 2 | Thin sheets, top surface quality | Pushes chips down, leaving a clean top edge. | Poor chip evacuation can lead to melting. |
| Straight Flute | 1 or 2 | Plunging, creating pockets | Creates a neutral cut without lifting or pushing. | Less efficient chip removal than spirals. |
| Ball Nose End Mill | 2 or 4 | 3D contouring and carving | Creates smooth, rounded surfaces. | Slower for flat-clearing operations. |
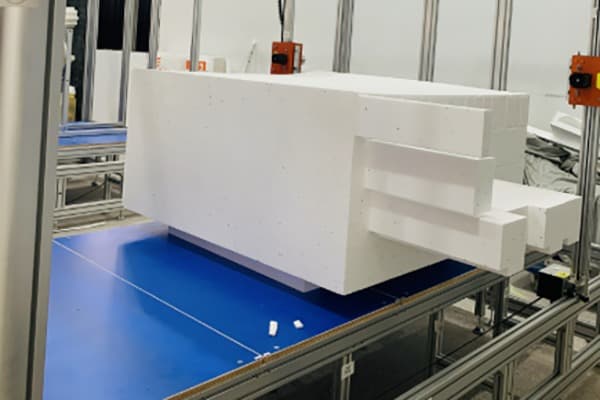
For most roughing work on foam, a single or double-flute up-cut spiral end mill is the go-to choice. The "up-cut" geometry acts like an auger, pulling chips up and out of the cut path. For finishing passes or achieving fine detail, a ball nose bit is ideal for creating smooth, organic shapes. The material of the bit itself is less critical than for cutting wood or metal, but a sharp edge is non-negotiable. A dull cutter will rub and melt the foam instead of shearing it cleanly. Many operators use custom-ground long-reach bits to carve deep into thick foam blocks without the machine’s collet hitting the workpiece.
Are Hot Wire CNC Foam Cutters a Better Option for Your Project?
While a CNC router carves foam with a spinning bit, a hot wire cutter uses a heated, taut wire to melt its way through the material. This method is incredibly efficient for certain applications and is a cornerstone of the EPS industry. The primary advantage of a hot wire machine is speed and efficiency when making 2D or simple 2.5D cuts. It can slice through a massive block of foam in a fraction of the time it would take a router, and it produces almost no dust—only fumes, which must be properly ventilated.
Hot wire cutters excel at creating architectural moldings, RC aircraft wings, and large-scale lettering. The process works by creating a starting profile and an ending profile and the machine moves the wire along that path. Because the wire must pass all the way through the material, you cannot create internal pockets or complex 3D surfaces like you can with a router. The width of the cut, known as the "kerf," is determined by the wire’s thickness and temperature. This process is perfect for creating parts with a consistent cross-section.
So, which one is better? It depends entirely on the job.
- Choose a CNC Router if: You need to create complex 3D surfaces, internal pockets, detailed engravings, or work with high-density polyurethane tooling board.
- Choose a Hot Wire Cutter if: You are cutting large volumes of 2D shapes from EPS or XPS foam, such as lettering, architectural columns, or insulation panels.
In many large-scale operations, businesses use both. A hot wire cutter is used to quickly rough out the basic shape from a large foam block, and then a CNC router is used to add the fine details. This hybrid approach leverages the strengths of both technologies.
How Do You Determine the Perfect Speed and Feed Settings?
Finding the "sweet spot" for speed and feed rate is crucial for a clean cut. This is a topic that comes up constantly in online forum discussions and with my clients. The "feed" is how fast the machine moves the cutter through the material (e.g., in inches per minute), and the "speed" is how fast the spindle is spinning (RPM). The relationship between these two determines the "chip load"—the amount of material each flute of the cutter removes per revolution.
For foam, the general rule is: move fast. A slow feed rate gives the spinning bit too much time in one place, generating heat that can melt the foam. This results in a gummy mess on your bit and a poor-quality edge on your part. You want to move the cutter fast enough that it’s constantly biting into fresh, cool material. This creates clean, crisp chips instead of melted plastic. A good starting point is a high spindle speed (18,000-24,000 RPM) and a fast feed rate.
The ideal setting will vary based on:
- The type and density of the foam.
- The diameter and number of flutes on your cutting bit.
- The depth of the cut.
- The rigidity of your CNC machine.
Always perform a test cut. Take a small piece of your material and try different combinations. Listen to the sound of the cut. A smooth, quiet hum is good. A high-pitched squeal often means your RPM is too high for your feed rate, causing rubbing. A deep chugging sound can mean your feed rate is too high for the RPM, putting too much load on the tool. Start with the recommendations from your tool supplier and adjust in small increments until you get a clean, smooth finish with well-formed chips.
What’s the Best Way to Secure Foam to Your CNC Bed?
Workholding—the method you use to hold your material in place—is surprisingly critical when working with foam. Because foam is so light, it can easily shift or vibrate during cutting if not secured properly. A part that moves even a fraction of a millimeter can be ruined. You need a method that holds the entire sheet or block securely without compressing or damaging it.
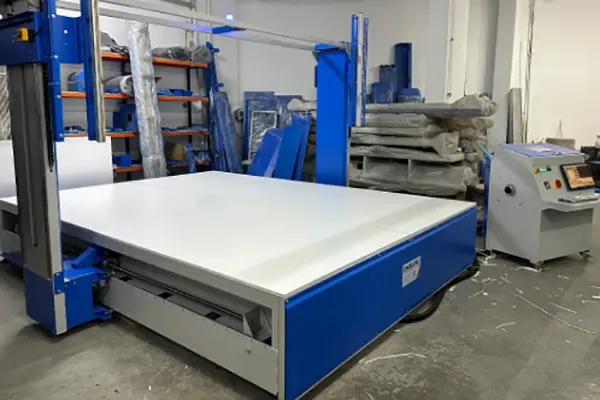
One of the most effective methods is a vacuum table. A vacuum table uses suction to hold the material down firmly against the machine bed. This is ideal for cutting full sheets of foam board as it provides even pressure across the entire surface. For smaller pieces or blocks, a custom-made fixture or jig can work well. This involves creating a dedicated mold or frame that the foam piece fits into snugly.
Another common method is using adhesives. A light mist of spray adhesive on the bottom of the foam can be used to stick it to a sacrificial board (like MDF) that is then clamped to the CNC bed. Double-sided tape is another option for smaller pieces. If you need a more robust hold for aggressive 3D carving, you can drive screws through the waste areas of the foam block directly into the spoilboard. Just make sure your tool paths in the CAM file are programmed to avoid hitting them! The key is to ensure the foam is perfectly flat and cannot move in any direction during the cutting process.
How Can You Optimize Your CAD/CAM File for Foam Cutting?
The quality of your final product starts with the quality of your digital file. A well-prepared design in your CAD (Computer-Aided Design) and CAM (Computer-Aided Manufacturing) software can save you hours of frustration and wasted material. First, ensure your 3D model is "watertight," meaning it has no open gaps or holes that could confuse the software. Clean geometry is essential.
When creating toolpaths in your CAM software, think in layers. For deep carving, use multiple roughing passes to remove the bulk of the material. This is done with a larger diameter bit and a significant "stepover" (the distance the tool moves over between passes). This clears material quickly without putting too much stress on the tool or machine. After the roughing passes, you’ll run a finishing pass. This is done with a smaller, often ball-nosed bit, a very small stepover, and a faster feed rate to create a smooth final surface. This two-stage process is standard practice in conventional milling and is highly effective for foam.
Another important consideration is the cutting strategy. For clearing flat pockets, a "raster" strategy (moving back and forth in straight lines) is efficient. For complex 3D surfaces, a "3D offset" or "spiral" strategy that follows the contours of the shape will produce a better finish. Pay close attention to your plunge moves—how the bit enters the material. Ramping into the cut (entering at a shallow angle) is much gentler on the tool and the foam than plunging straight down. A great design on paper can fail in production without smart CAM programming.
What are Common Problems in CNC Foam Cutting and How to Solve Them?
From my experience helping customers set up their operations, I’ve seen a few common issues arise. As an owner like Mark knows, downtime is the enemy of profit, so getting ahead of these problems is key.
-
Problem: Melting instead of Cutting.
- Cause: This is almost always due to incorrect speeds and feeds. The feed rate is too slow for the spindle speed, generating excessive heat. It can also be caused by a dull cutter.
- Solution: Increase your feed rate. If that’s not possible, decrease your spindle RPM. Always ensure your bit is sharp. A clean, sharp edge is paramount for a clean cut.
-
Problem: A Fuzzy or Hairy Surface Finish.
- Cause: This is common in softer foams like PE or flexible polyurethane. The foam is tearing or deflecting away from the bit instead of being cleanly sheared. Using a bit with the wrong geometry (e.g., a down-cut spiral) can also cause this.
- Solution: Use an extremely sharp, single-flute up-cut bit. A specialized knife blade tool, sometimes called a "drag knife" or needle cutter, can also be used in a CNC spindle to slice through thin foams for a perfectly clean edge.
-
Problem: The Foam is Shifting During the Cut.
- Cause: Inadequate workholding. The cutting forces, even on light foam, are enough to dislodge an improperly secured workpiece.
- Solution: Re-evaluate your workholding strategy. Use a vacuum table, more clamps, better adhesive, or a custom fixture. Ensure the material is completely immobile before you press start.
For those running a full production line, preventing these issues is about having robust and reliable equipment. A machine that can maintain high speeds without vibration, like our CNC EPS Cutting Machine, is fundamental. And when issues do arise, having direct access to technical support from the manufacturer can be the difference between a minor tweak and a full day of lost production. This is a major pain point I hear about from buyers, and it’s something we focus heavily on.
Beyond Cutting: What Finishing Techniques Should You Use on Foam Products?
The CNC cut is often just the first step. Depending on the final application, your foam part may need some post-processing to get it ready. For EPS and XPS, the surface can be lightly sanded to smooth out any tool marks. Use a very fine grit sandpaper (220 or higher) and a light touch to avoid damaging the foam’s cell structure. A sanding block helps to keep surfaces flat.
For many applications, especially in props, displays, and architectural models, the foam needs to be sealed and hardened. Applying a protective coating not only makes the part more durable but also prepares it for painting. There are many options available:
- Epoxy Resins: These provide a very hard, durable shell. They can be brushed or rolled on. Some epoxies are sandable, allowing for an automotive-grade smooth finish.
- Polyurethane Hard Coats: These are often sprayed on and create a tough, plastic-like skin over the foam. They are excellent for impact resistance.
- Wood Glue or Drywall Compound: For a budget-friendly option, multiple coats of thinned wood glue or drywall compound can be used to seal the foam before painting. This works well for prototypes or non-structural parts.
When painting, it’s critical to use a water-based paint, like acrylic or latex. Solvent-based paints (like those in most aerosol spray cans) will melt and dissolve polystyrene foam, destroying your part. Always test your coating and paint on a scrap piece first to ensure compatibility. This final step can elevate a simple foam shape into a professional, finished product. And for businesses producing waste foam scraps, investing in recycling equipment is a smart move. A machine like an EPS Recycling Machine can process this waste, turning a cost into a potential revenue stream.
Key Takeaways for Mastering CNC Foam Cutting
As we’ve covered, success in CNC foam cutting is a blend of the right machine, the right tools, and the right techniques. It’s a process that offers incredible creative and commercial potential when approached with knowledge and care.
Here are the most important things to remember:
- Choose the Right Foam: Understand the properties of EPS, XPS, EPP, and Polyurethane to match the material to your project’s needs.
- Invest in the Right Machine: Prioritize a rigid frame, a large work area with sufficient Z-axis height, and a high-RPM spindle.
- Select the Correct Bit: Use sharp, up-cut spiral bits with one or two flutes for most foam applications to ensure efficient chip evacuation.
- Master Speeds and Feeds: Run a high spindle speed and a fast feed rate. Always perform a test cut to dial in the perfect settings and avoid melting.
- Secure Your Workpiece: Use a vacuum table, adhesives, or fixtures to ensure your foam block is completely immobile during the cutting process.
- Optimize Your Software Workflow: Use a two-stage cutting process (roughing and finishing passes) in your CAM software for the best results.
- Don’t Forget Finishing: Sand, seal, and coat your foam parts to increase durability and prepare them for painting with water-based paints.
Post time: 08-26-2025