
How to Install an EPS Block Molding Machine: Site Prep to First Block
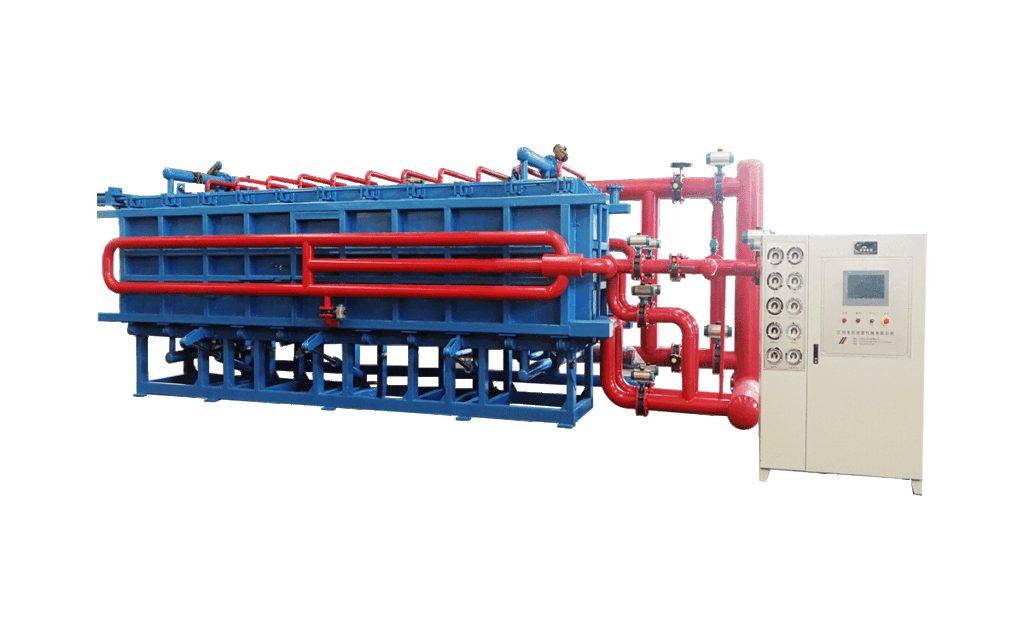
A new EPS block molding machine is “ready” only after a clean, measured first block on your real density — not when the truck leaves. Installation is where most first-month quality problems are actually born, so treat commissioning as seriously as the purchase. This guide walks from civil works to the first cured block.
Before the machine arrives
Reserve a level floor with clear access for the block and the steam line, a stable three-phase supply (check the nameplate), and drainage for condensate. Confirm ceiling height for the vertical frame or floor span for a horizontal block molding machine. Keep the upstream pre-expander and silo layout in mind so bead flow reaches the moulder without long, lossy runs.
What the machine is sized to do
Block molding machines in the SPB-2000 to SPB-6000 range handle block lengths from 2,000 mm to 6,000 mm at about 12–15 blocks/hour at 15 kg/m³. Match the machine to your moulded block length, not to a catalogue number — sizing the moulder for a shorter block than you actually run forces you to cut blocks in half first.
| Model range | Block length | Throughput @15 kg/m³ | Typical use |
|---|---|---|---|
| SPB-2000 | 2,000 mm | ~12–15 blocks/h | Standard block, sample runs |
| SPB-4000 | 4,000 mm | ~12–15 blocks/h | Standard block + shape split |
| SPB-6000 | 6,000 mm | ~12–15 blocks/h | Long board, high-volume lines |
Site and civil works
- Floor. A level, load-bearing slab sized for the filled frame and the block handling path. A twisted foundation is the most common cause of drift and wear.
- Drainage. A trench or floor slope that carries condensate away from the pit — water pooling at the low point cools steam and pits the surface.
- Lift points. Confirm crane or forklift access and rated lifting points before the machine is on site; the frame is awkward to move once placed.
Steam piping specification
Size the steam line for the die’s rated pressure at the die, not at the boiler. Run a separate condensate return so traps discharge freely, and fit isolation and a pressure gauge at the machine. An undersized line drops pressure under load and forces longer cycles and uneven fusion — the accumulator (covered in our steam system guide) protects the die from boiler swings but cannot fix a pipe that is too small.
Electrical and control
- Supply. Stable three-phase at the nameplate voltage, with a solid earth. Wrong voltage or a poor earth damages the transformer and steam controls.
- Control program. Load the commissioning program and jog every axis before any bead enters the cavity. Verify safety interlocks before a steam cycle.
Installation checklist
- Level the frame. Shim and re-check corner to corner; a twisted frame bows accuracy downstream.
- Confirm power and earth. Meter the supply at the panel, not just at the plug.
- Connect steam and drainage. Pressure-test the steam line, then route condensate away from the pit.
- Set fill and seal. Verify even bead distribution and a clamp that seals without leak at the parting line.
- Dry steam cycle. Run a steam cycle with no bead to prove the loop before production.
Your first block
Start with a scrap run at a conservative density program, watch the parting line and fusion, then raise to your production density using the pre-expander’s density guide. Measure the block, adjust fill and steam, repeat until on tolerance. A height-adjustable frame helps you prove several block heights on one machine during commissioning.
First-month watch list
| Week | Watch |
|---|---|
| 1 | Steam pressure stability at the die, parting-line flash, first measured block tolerance |
| 2 | Cycle time vs nameplate, drainage behaviour under load |
| 3–4 | Repeatability across blocks, seal wear, any drift in density |
Connecting upstream and downstream
The moulder does not stand alone. Confirm the pre-expander can hold density while the moulder draws, and that the silo buffers enough aged bead for a shift so a pre-expander stop does not starve the line. Downstream, leave clear space and a level path for the cutting line that follows — the block handler and the cutter are part of the same cell, so plan their floor positions together rather than fitting them in afterwards.
Acceptance checklist
| Check | Pass criterion |
|---|---|
| Frame level | Corner-to-corner within tolerance, no twist |
| Steam at die | Pressure holds through the full cycle, no sag |
| Drainage | No standing water after vent; vacuum pulls down fast |
| First block | Measured on tolerance at production density |
| Interlocks | All safety interlocks verified before steam |
Common installation mistakes
- Unlevel foundation. Fix it before bolting down — it is the root of most drift and premature wear.
- Undersized steam line. Pressure drops at the die force longer cycles and uneven fusion.
- No drainage plan. Condensate pooling cools steam and pits the surface.
- Skipping the measured first block. “It ran” is not “it is on tolerance” — take the measurement.
Frequently Asked Questions
How long does commissioning take?
For a standard block line with power and steam ready, a careful commissioning including the measured first block is usually a few shifts — longer if foundations or steam must be reworked.
Vertical or horizontal for my floor?
Vertical grows upward and suits standard panels; horizontal spans the floor and suits long or heavy blocks and in-line handling. See our vertical vs horizontal comparison.
Do I need the silo before commissioning?
You can run without it, but a silo lets the pre-expander batch while the moulder draws aged bead — without it, every pre-expander stop starves the moulder.
What utility checks matter most?
Steam pressure at the die, a solid earth, and clean drainage. Those three decide whether the first block is on spec.
Should I use your technician for commissioning?
For the measured first block and the steam-loop verification, a technician saves a day of trial and error — especially the pressure-curve log that becomes your baseline. If your team is experienced, a remote checklist works; for the first line, on-site commissioning is the cheaper path than a week of self-diagnosis.
Install the machine once, commission it properly, and it pays back for years. For a site-layout review or a commissioning spares list matched to your model, contact our team.